
The half hitch knot in macrame is very easy to learn for beginners, but also extremely versatile for fiber artists at all levels.
The half hitch, double half hitch, horizontal half hitch, and vertical half hitch all share the same basic steps, and we’ll run through all of them in this tutorial.
Here’s how to tie all variations of the macrame half hitch knot, with step-by-step instructions and photos!
Affiliate disclosure: Articles on Tiny Workshops may contain affiliate links.
How to tie a macrame half hitch knot
The macrame half hitch knot is, true to its name, only half of the process you’ll need for most patterns, but it’s still applicable for some projects.
The most common involves repeating a half hitch on the same filler cord, which creates a natural spiral. This is often called a half hitch spiral or forward knot.
For this tutorial, I’m using a braided cord from Bobbiny, but any cord will do. If you want to learn more, check out our guides to macrame cord and macrame supplies we recommend.
Here’s how to tie a macrame half hitch knot.

Step 1
For simplicity, start with a folded cord tied to a dowel with a lark’s head knot.

Step 2
Take the left (working) cord and bring it over the top of the right (filler) cord.

Step 3
Wrap the working cord around the filler cord and through the loop on the left.

Step 4
Tighten the cord to complete your half hitch knot.

Step 5 (optional)
Continue to tie half hitch knots down the cord to create a forward knot.
You can get the same results by wrapping your working cord behind the filler cord, with the spiral turning the other way.
Again, this is typically only half of the process, so keep reading to learn more applications for this knot.
How to tie a macrame double half hitch knot
Although the name sounds a bit funny, the double half hitch knot is one of the most common knots in macrame, with virtually unlimited design possibilities.
It’s also very easy to learn and master, even for beginners.
I’ve used two colors of cord in this double half hitch knot tutorial for clarity, but typically you’ll be working from the furthest left cord to the right. Here are the steps.

Step 1
Bring your fill cord (yellow) over the top of your working cord (purple).

Step 2
Wrap your working cord around your filler cord and to the left.

Step 3
Tighten your cord, finishing your first half hitch knot. Check vertical placement in your working cord, but don’t worry about excess filler cord at this point.

Step 4
Wrap your working cord around your filler cord and to the left again. Take care to keep your first knot tight.

Step 5
Tighten your working cord to finish your double half hitch knot. You can tighten or loosen your filler cord at any point.
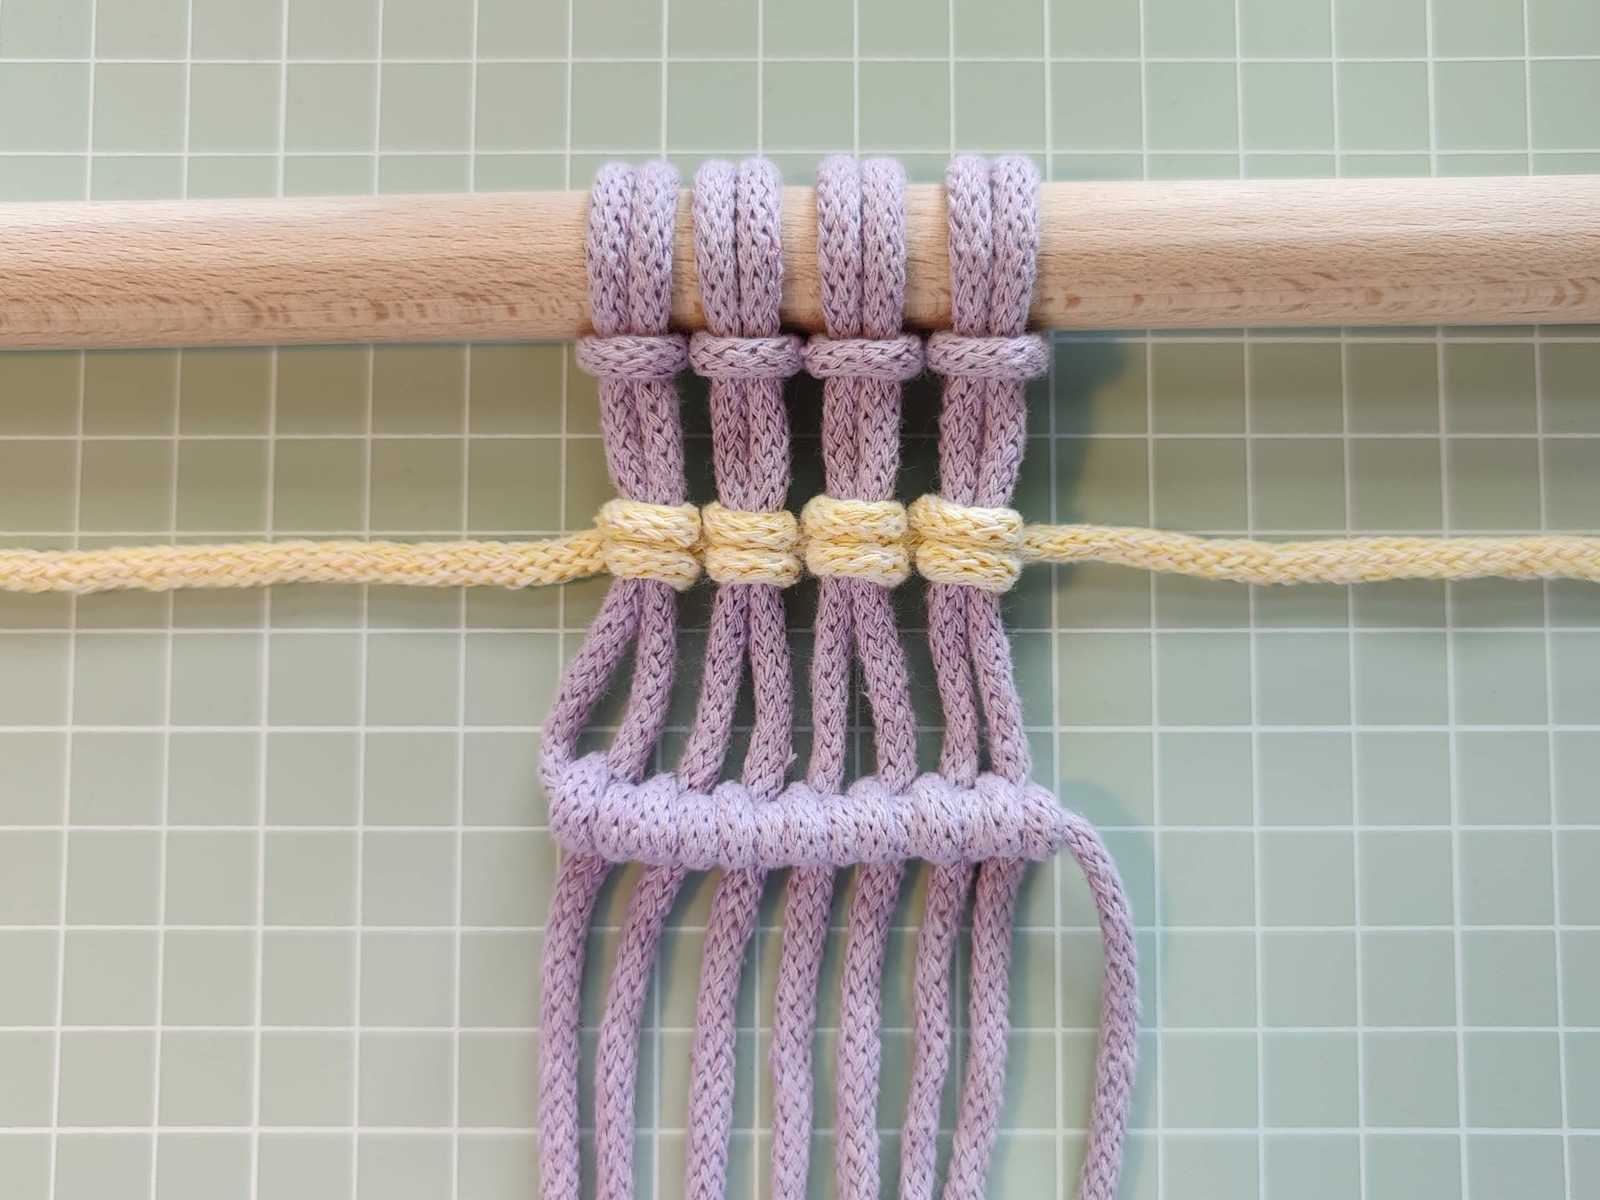
How to tie a horizontal double half hitch knot
Now that you know how to tie a macrame double half hitch knot, we’re going to move on to a few applications for your projects.
The easiest and most useful is the horizontal double half hitch knot. You will find this knot in tons of wall hanging patterns, as well as in bracelets, macrame belts, and more!
Note that although this is called the horizontal double half hitch knot, you can orient your cord at an angle to create diagonal lines, curves, or whatever shape your heart desires!
Here’s how to tie a simple horizontal double half hitch knot for macrame. Again, I’ve used a single yellow cord for better visibility, but typically you’ll use the cord furthest to the left.

Step 1
Place your filler cord (yellow) over your working cords (purple). It can be horizontal, diagonal, or curved.

Step 2
Wrap your first working cord over your filler cord, then to the left.

Step 3
Tighten your cord to create your first half hitch knot. Make sure the vertical spacing, but don’t worry about excess filler cord.

Step 4
Loop your working cord around and to the left of your filler cord again to form a double half hitch knot.

Step 5
Tighten the knot, taking care to keep vertical spacing correct.

Step 6
Using your second working cord, tie another half hitch knot, again watching vertical spacing.

Step 7
Tie another half hitch knot and tighten, keeping things as neat as possible.

Step 8
Continue the process across all cords to finish your horizontal double half hitch knot. Tidy up your filler cord by sliding the knots to the left or right.
How to tie a vertical double half hitch knot
The vertical double half hitch knot in macrame is very similar to the steps above, with one exception: it’s additive.
That means that instead of using one of your hanging cords, you will add a new working cord to the piece and using hanging cords as filler. The knots are also oriented the other way.
This technique is the best way to add a pop of color to your wall hangings, and it can be used to create detailed pixel-art style tapestries of all kinds! However, it doesn’t lend itself as well to curved lines.
Here’s how to tie a macrame vertical double half hitch knot.

Step 1
Wrap your working cord (yellow) under and around your first two filler cords (purple), working upward.

Step 2
Tighten your first half hitch knot, keeping things as neat as possible.

Step 3
Tie your second half hitch knot beneath the first, with the remaining cord continuing between the two knots.

Step 4
Tighten the cord, again keeping things neat.

Step 5
Tie another half hitch knot in the second two filler cords, then tighten.

Step 6
Finish your double half hitch knot on the second set of filler cords. Try to keep the space between lines tight and neat.

Step 7
Continue the process until you reach the end of the line.
To finish your knot, you can either continue to the next line down or tuck your cord behind your piece to secure it.
Although it’s the same basic knot, a vertical double half hitch knot looks quite different from a horizontal double half hitch knot. See the image below for a comparison.

Also note that vertical placement is less important in this knot since you can just slide them up or down the filler cord. Just make sure your horizontal spacing is neat and you’re good to go!
That’s it for our guide on how to tie a macrame half hitch knot! Feel free to drop any questions or tips for beginners in the comments below.
Leave a Reply