
So you’ve bought a tufting gun and you’re ready to learn how to make a tufting frame, huh?
The good news is that they’re fairly easy to make, and don’t require much in the way of tools or materials.
I decided to upgrade my tabletop frame after a few years of use, so I documented the full process of how to make a tufting frame to help all the newbies out there get started!
Affiliate disclosure: Articles on Tiny Workshops may contain affiliate links.
Required tools and materials
As mentioned above, you don’t need many tools to make a tufting frame. Here’s what I use in this tutorial:
- Drill and bits
- Saw
- Hammer
- Screws
- Wood (lengths below)
- Wooden dowel
- Nails or carpet strips
- Ring screws
- Sandpaper
Many of these things you will likely already have at home. However, make sure you buy lumber that isn’t likely to flex under pressure. The wood I used for this tufting frame tutorial is slightly smaller than a standard 2×4, at 3x7cm.
I used a simple 22mm dowel for the yarn platform, but make sure yours is small enough to fit into your tufting yarn cones. Also, make sure that you have a drill bit that’s the same size.
For the top yarn feeder, I used a smaller piece of scrap wood I had from a previous project. The thickness of this piece doesn’t matter.
Most tufting frames you see online likely use carpet strips, but if you’re like me and live in a place where carpet isn’t common, you can just as easily use nails. Just make sure they’re not too thin or they will snap under pressure. The nails I used are 1.4x25mm.
If this is already sounding like too much for you, remember that you can always buy a kit and assemble it at home. The process and results are similar but you get to skip most of the steps.
How to make a tufting frame

And now for the main attraction: How to make a tufting frame.
I made my frame 100x85cm (~40x33in), but that size was mostly to suit the table I planned to clamp it to. That said, there is some logic to think about when deciding on your size.
For smaller tufting frames, look at the size of your tufting cloth and choose a measurement that divides the cloth evenly. For example, my cloth is about four meters (157in) wide, so I can get roughly three rugs per yard of cloth.
If you want to make smaller rugs, you can easily get four rugs per yard of cloth. Just change the measurements to 85x85cm (33x33in).
With that out of the way, let’s get to it!
Step 1: Prepare your supplies
Once you’ve made a trip to the store to buy what you need, the first step is to cut your lumber down to size. Here are the sizes I needed for my frame:
- Bottom rail: 105cm (~41in)
- Top rail: 100cm (~39in)
- Side rails (x2): 75cm (~30in)
- Yarn platform: 32cm (~12in)
The exact measurements for your frame may vary, but the pieces are all essentially the same. Just make sure your bottom rail is slightly longer than the top rail and the sides are the same.
Once you’ve cut them, give the edges a light sand to prevent your cloth or yarn from catching on any rough edges.
Cut two lengths of your dowel that are about 3cm or an inch and a half longer than the height of your tufting cones.
Step 2: Assemble the frame

Now it’s time to put together your frame!
Lay the top rail on top of the bottom rail, leaving an equal space on both sides. This is so that you can clamp it to the table. Mark the ends with a pencil as shown above.
Now, place one of your side rails upright on the bottom rail, with the outer edge touching your pencil mark.

Pre-drill and counter-sink two holes through both pieces from the bottom. Then, screw in your screws, making sure the two pieces are flush.

Repeat this process for the other side rail, then the top rail. It should start looking like a tufting frame at this point.
If it’s feeling loose, make sure your screws are all the way in and the rails are flush with each other. If your wood is very thin or your frame is larger, you can also consider adding some L-brackets to the corners.
Step 3: Attach the yarn platform

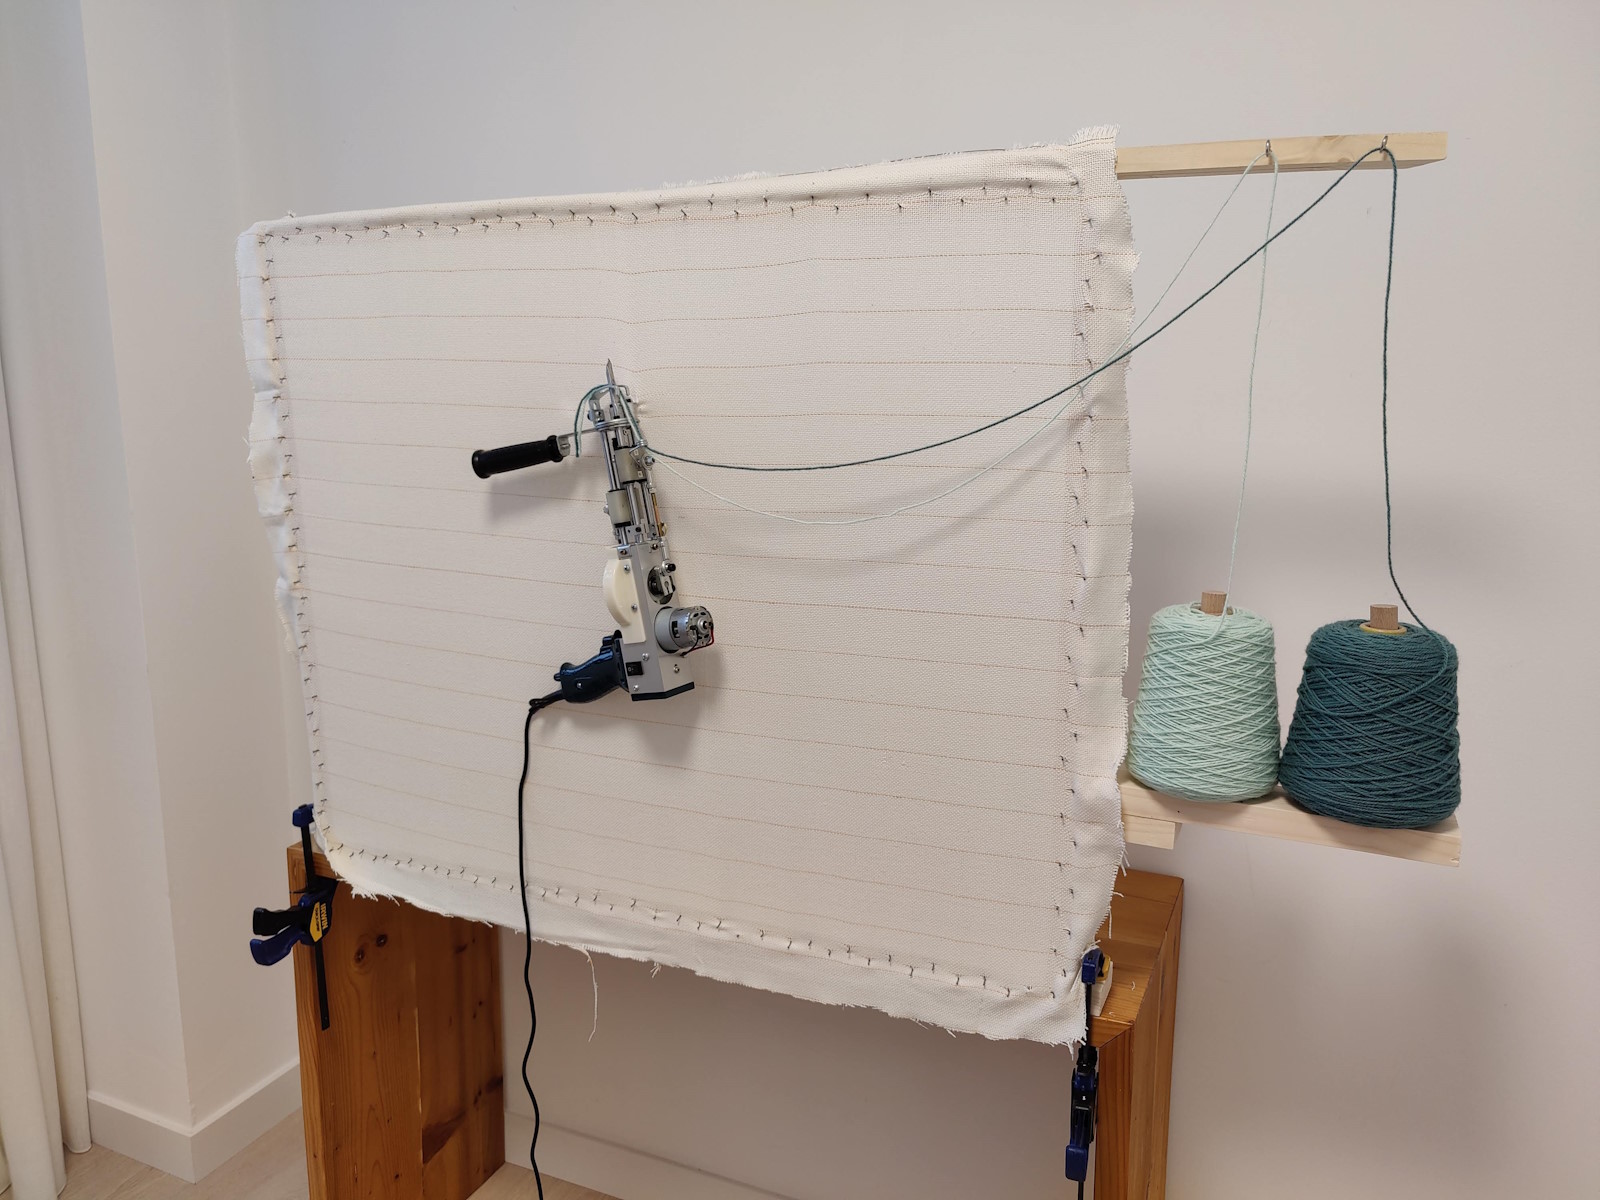
Next up is the place to set your yarn while you work. I always recommend threading at least two tufting yarn threads at once, and this design accommodates two cones with ease.
Grab the 32cm piece you cut earlier, two yarn cones, and the two dowels.
Using your cones as a guide, mark two spots to drill the holes for your dowels. They should be far enough apart that they don’t touch. For me, this was about 15cm.
(Note: if you use a yarn winder to double-thread your yarn into a single cone, you can just use one dowel and make it smaller.)

Using a flat bit, drill a hole about halfway through the wood for your dowels. They should fit somewhat snug, but you shouldn’t need to glue them. Your cones won’t move while you tuft.
Now, screw this board into the side of your tufting frame. Which side depends on whether you’re left- or right-handed.

I screwed mine into the right side because I’m right-handed. That way the yarn can feed more freely into the machine, since my body won’t be between the yarn and the tufting gun.
You may also notice that I added a little scrap of wood underneath for extra support, but after testing this is probably overkill.
Step 4: Attach the upper yarn feeder

Using a separate piece of wood and two ring screws, assemble an “arm” to attach to the top of your frame, above your yarn cones. As mentioned earlier, I used a thinner piece of scrap wood for this.
Screw in your ring screws so they sit directly above your cones, then attach the whole piece onto the top of your frame with screws.

This should allow both threads to feed freely while you tuft, which will prevent snags so you don’t have to thread yarn into your tufting gun over and over.
Step 4: Add nails or carpet strips

The last step is to add nails or carpet strips to the sides of your frame. These will hold your tufting cloth taut while you work.

Hammer your nails a little over halfway into the rails of your frame, angling them away from the center. Add nails every few centimeters in a zig-zag pattern, as seen in the image above.

And that’s it! You can now clamp your tufting frame to a table and get started on your first rug!
If you still don’t have everything you need, check out our list of essential rug tufting supplies for more info.
More tufting frame tips

Tufting frames aren’t particularly complicated structures, but here are a few more tips I’ve learned since making my first frame a few years ago.
Make sure you’re using strong clamps, and if you’re worried about damaging your table slip a piece of scrap wood between the table and your clamp.
Also, make sure you pull your tufting cloth nice and taut across the frame before starting. Use the lines in your cloth to make sure tension is even across the frame.
Whatever you do, don’t forget to mirror your design on the frame. There’s nothing worse than realizing your rug is backwards halfway into your project.

Remember to wait for your tufting glue to be dry before cutting your rug from the frame. This typically takes around 24 hours.
Finally, start with a small tabletop tufting frame before making a big standing frame. I know your heroes on RugTok make huge, spectacular rugs, but for beginners, it’s better to start small.
That’s it for this guide to how to make a tufting frame! Drop any questions, comments, or tips below and I’ll get back to you asap.
Leave a Reply